The Crafty Corner
Something different for us, a little craft corner where we can share our crafting ideas and how-to's.
*******
Painty The Snowbrush
September 27, 2017


 It's been way too long since I have posted but it was a busy year, new designs, writing my book, playing, goofing off......you know the story.
Something different for us, a little craft corner where we can share our crafting ideas and how-to's.
*******
Painty The Snowbrush
September 27, 2017


This is a super easy and quick project. The pictures do the explaining, and if you have an old used paint brush all the better, it will give this guy more character OR you can prim it up, coffee stain the brush and maybe even the handle.
Cut a strip of white for the brim of his hat (I had a piece of fur that I glued onto the brim) wrap it around to the back and glue. I used black shoe button eyes (but black buttons would be really cute, and a wooden ball for his nose. Blush his cheeks and nose and take a piece of wire, bend to fit the width of his eyes for spectacles.
The hat - just take a piece of card stock or paper and draw a triangle for your pattern, sew right sides together (can cut on the fold so you have only one seam) make sure it's long enough for the size brush and wide enough so it fits around the "neck" of your brush, turn right side out, and press. I added a rusty jingle bell and a piece of coffee stained cord - Mr. Painty The Snowbrush. If you want to add a hanger on the back just make sure it will be secure enough to hold him up on a hook.
**********************
Wine Glass Snow Globe
December 2, 2016


 Finished

This is a fast and fun project, perfect for using with a place card on your Christmas dining table.
Wine Glass Snow Globe
December 2, 2016


This is a fast and fun project, perfect for using with a place card on your Christmas dining table.
Oversized wine glass, cut 2 discs (traced around mouth of glass, 1 cardstock, one white felt). Use stickers (for scrapbooking), I also used a little sponge tree that I had in my stash, and glitter.
Glue 2 discs together, let dry. Glue sticker(s) on disc, maybe a little tree, let dry. Now pour your glitter into the wine glass, determined by how much "snow" you want, put white glue (I used Instant Grrrrip), around the lip of the glass, take disc and carefully put in place, it will be right side up at this point, let dry completely, turn glass upside down - and there you have it - a lovely snowglobe.
*****************
Saturday, March 12
Happy Weekend. I goofed, no spring craft project to tell you about. We are under major master bed/bath construction and I didn't have time to think of a project. So sorry.
****************
Mr. Snowy the Snowman
Tutorial
 Supplies Needed
men's white athletic sock
plastic pellets or rice
buttons
beads
felt for scarf
Orange Fimo (or other) for carrot nose, can also use stick or thin dowel
Heavy Duty White thread
Scissors
Decoration for hat
 Cut your sock as shown, put aside the toe piece.
*****************
Saturday, March 12
Happy Weekend. I goofed, no spring craft project to tell you about. We are under major master bed/bath construction and I didn't have time to think of a project. So sorry.
****************
Mr. Snowy the Snowman
Tutorial

men's white athletic sock
plastic pellets or rice
buttons
beads
felt for scarf
Orange Fimo (or other) for carrot nose, can also use stick or thin dowel
Heavy Duty White thread
Scissors
Decoration for hat

Turn the other piece inside out, tie off the cut opening and knot several times.
Turn right side out, the tied off section is your snowman's bottom.


This is how it should look BEFORE you turned it right side out.

And this is turned right side out, and now the fun begins.
Now begin stuffing from the top of the sock. I use plastic pellets because I have a huge supply left from teddy bear making, rice would work, maybe small dried beans. Fill enough so that now your sock will stand and it makes it easy to continue pouring your stuffing in


See, much easier

Fill to just under the knitted band, tap the sock down (HOLD THAT OPENING CLOSED) and the stuffing material will settle letting you decide if you want more stuffing. Secure the top with heavy duty white thread.

With both hands gently squeeze in the middle to form two balls, his bottom and his head. When he is the way you want him to look use your thread and tie off in that middle section. Loop around several times to make sure the thread will not break.

Don't worry about the "knob" his hat hides it.

Take the toe piece (it's right side out because we didn't turn it in the beginning) and fold raw edge to make a little brim, repeat one more time.

His little hat is on, fiddle with it until you like the look, I pull the top over a bit and toward the side. Using GoldToe brand socks makes a nice gentle color to the top of his hat, but that is a matter of choice.

Glue beads or small buttons for his eyes, down his tummy (rusty bells are adorable too).
His nose - if you have orange Fimo great - make a wee little carrot, a piece of stick, dowel, whatever you want his nose to be will give him "your" character.
*If you feel more comfortable attaching his nose after he is all finished that is great.
Glue on his nose - I lay him down and let the glue set a minute and then dip the flat side of the nose into the glue, position it where you want it and let the glue dry.
Walk away (I know he is looking adorable but that nose needs to set), find some fun decorations for his hat, cut a strip of felt or homespun fabric for his scarf, maybe attach a little rusty bell, sprig of holly, again this is your snowman, use what you have in your stash.
When his nose is completely dry attach his scarf, glue on his hat decoration - just make sure you don't knock into that nose.
And...there he is......

I hope you enjoyed this project.
Merry Christmas
*********
Christmas Tree Top
now
A Feather Tree
Part 3

Christmas Tree Top
Part 2


It's fun watching the topper (tree) take on a new look, I like how it's looking, a wee bit hard on the hand that you are cutting with but working a little at a time makes a difference. It's just difficult to make yourself stop when you see your progress.
See you next time....
************
Friday
November 20
Christmas Tree Top
 This poor little "tree" is the top of a tree that we no longer used, it had been packed away for years and it was time to say good-bye. At the last minute I grabbed the top and ran. Husband wasn't sure what had happened and I didn't say a word, but stashed it away with the decorations. That was last year. I was going to just make a little tree and decorate it. Then, "what to my wondering eyes should appear"....the idea of making a prim tree.
Friday
November 20
Christmas Tree Top

Today husband made a quick base for it so I could begin trimming the "needles". I have started and will post as my progress unfolds. I thought it would be fun to make this post a two or three part project.
*********
Tuesday
November 17
White Pine Cones
 Bleaching Pine Cones
Tuesday
November 17
White Pine Cones

2 parts bleach
1part water
Soak pine cones in the mix for 2 days, turning a few times. They will close as they soak but will reopen when dry. Air dry until they open. Please keep container away from children, pets and if you are doing this outdoors, away from wildlife.
******
Tuesday
October 6
Miniature Books

Tuesday
October 6
Miniature Books

*******
Wednesday
September 16
Miniature Gift Packages
It's been ages since I worked on miniatures and with the holiday season approaching I thought I would make a few mini packages.


I pulled out a small piece of tissue paper - it's easier to work with

and now just cut the amount for the package and wrap as you would a normal box but using glue for back and ends instead of tape.

Next the ribbon for the bow, I prefer silk ribbon because it is soft and very easy to make mini bows.

Just add a drop of glue on the back and also on the little knot on the front, just securing the ribbon and making it easier to tie the box. Tie the bow, snip the edges and there is a wee little gift wrapped package.

**********
Friday
March 13
"CHICK MOBILE"
Well, I do apologize for not posting a craft project since before Christmas, I am still working on new ideas, Snowmen have taken center stage but I need a break, and spring is almost here so I am posting a little bunny cart made from Jiffy Pots 3
 Needed is a Jiffy Pots 3, (little starter peat pots) 2 spools, 4 small wooden discs (optional), wire (I chose rusty wire), paint and brush. Cut peat pot in half, I was careful to cut one half without the drainage hole.
 I used a spring green for the "cart" and bright yellow for the "hubcaps", I lightly painted them so the grain would show. 2 pieces of string cut 7.5" each. I used "Burnt Umber" (brown) for the spools, again lightly painted.
 I glued the little hubcaps to the ends of the spools then cut a piece of wire 3" long (you can use plain wire, paper clip, whatever you have handy) the hat pin is to make sure the two holes are lined up, in fact you could use two or four for the wheels. I just squeezed the wire together with a little loop on the folded end and glued into the holes in the spools. Let dry completely.
 A closer look.
Glue the 7.5" piece of twine to each side of the cart, glue some Easter grass in the bottom of the cart. I bought Easter supplies at Hobby Lobby ™ a few years ago, after Easter when everything was marked down. Just went in my stash, put a few little chicks and eggs in the cart. You can make the eggs from a no bake clay and paint them, instead of chicks maybe little birds, or cute little bunnies. So many possibilities....

 Placement of the spools is anywhere you think they look cute. I chose to use the wide end of the peat pot for the front of the cart, but it looks really cute when you reverse it. Glue in place, let dry completely.
Hope you enjoyed this, it was fun and easy.
 The Chick Mobile.
My little bunny, Katie Kotton Tail (3" tall), was available as a kit several years ago. I am thinking of offering her as a downloadable pattern in the future. We shall see...
♫ Happy Spring ♫
********
Thursday
October 16
Miniature Candle & Holder
Funny how creative you can be when you don't have what you need when making miniatures.
 I made a sweet little bedtime mouse holding a candle for our BUTTERMILK & BEARS craft show (11/1) and she is holding a little candle, I don't have a mini candle so I put my brain to some creative thinking and this is what I did.
Acorn cap (ours are rather large here and it was a perfect size), even better if you can find one with its stem still attached, but it's just as effective if you glue one to the cap. Little piece of dowel, or a twig would work just as well, and the good old glue gun. Fill the cap with some glue, quickly put the dowel upright and hold for a second or two....or three. Now maybe "spill" a little more hot glue around the edge of the cap to look like melted wax.
Now comes the fun....play with the gun until just a small amount of glue (be careful) is on the tip, touch it to the side of the candle dowel to make a tear of wax, repeat twice more. For the flame, do the same but try to pull the gun up so the glue falls to one side. Don't worry, if you mess up let the glue dry and just take it off and try again. Same with the tears. Now paint the candle and the wax, let dry then go back and paint the flame yellow.
 There is my mini candle. Hope this was easy to follow, sometimes I know what to do but don't clearly put it into words.
Time for some telly, my brain is tired (giggle).
**********
Friday
October 10
THE 12 DAYS OF CHRISTMAS
 (I know this is way early but it does take time and planning)
I wanted to share with you a neat idea "The Twelve Days Of Christmas" (gift exchange). I have been doing this for several years and it's so much fun. Make sure you mail the package out so it arrives before December 13th. There are two ways -
First Way
Two friends decide to do this, it's 12 gifts, wrapped and dated, the first gift is marked "December 13", (this can be a Christmas card) through the 24th - Christmas Eve. You match the day with the # on the package, the "24th" is the special gift.
Second Way
You do it as a surprise for a friend. Wrap & # as above. In the packing box you write a note explaining what is to be done, I use a Christmas card and mark that #13 so she opens that the first day and understands what is going on. I did this to my sweet friend, Carol, over at Buttermilk Creek Farm, three years ago and we are still going strong.
Another idea is sending something (extra) for the hubby, like a coffee mug or something that you know he would enjoy, and don't forget the pets.
Ideas:
special coffee, notebook, bookmark, crafting supplies (if she is a crafter), a few 1/4 yards of fabric with matching thread (if she is a quilter), Christmas dish towels, placemats, Christmas coffee/tea mug, coffee, tea bags, really - the sky's the limit. It doesn't have to be expensive, but things that will be special to your friend, and handmade is always well received. Another idea - you can send a small (tabletop) tree and use the 14th - 24th with decorations. My friend Cindy, in Colorado, sent me all sorts of miniature things and my Christmas Eve gift was the roombox for me to decorate with all the gifts.
Last year we were moving out of state on 11/16 and I had 2 12 Days going. It wasn't the way I wanted it to be but I certainly did not want to disappoint my friends. I just told them to just pick one and open it, but I did mark "Christmas Eve" on the special gift. Their packages were mailed out in October and marked "Open on 12/13". (o: And those sweet friends did wait.
Friday
March 13
"CHICK MOBILE"
Well, I do apologize for not posting a craft project since before Christmas, I am still working on new ideas, Snowmen have taken center stage but I need a break, and spring is almost here so I am posting a little bunny cart made from Jiffy Pots 3
Hope you enjoyed this, it was fun and easy.
My little bunny, Katie Kotton Tail (3" tall), was available as a kit several years ago. I am thinking of offering her as a downloadable pattern in the future. We shall see...
♫ Happy Spring ♫
********
Thursday
October 16
Miniature Candle & Holder
Funny how creative you can be when you don't have what you need when making miniatures.
Acorn cap (ours are rather large here and it was a perfect size), even better if you can find one with its stem still attached, but it's just as effective if you glue one to the cap. Little piece of dowel, or a twig would work just as well, and the good old glue gun. Fill the cap with some glue, quickly put the dowel upright and hold for a second or two....or three. Now maybe "spill" a little more hot glue around the edge of the cap to look like melted wax.
Now comes the fun....play with the gun until just a small amount of glue (be careful) is on the tip, touch it to the side of the
Time for some telly, my brain is tired (giggle).
**********
Friday
October 10
THE 12 DAYS OF CHRISTMAS
I wanted to share with you a neat idea "The Twelve Days Of Christmas" (gift exchange). I have been doing this for several years and it's so much fun. Make sure you mail the package out so it arrives before December 13th. There are two ways -
First Way
Two friends decide to do this, it's 12 gifts, wrapped and dated, the first gift is marked "December 13", (this can be a Christmas card) through the 24th - Christmas Eve. You match the day with the # on the package, the "24th" is the special gift.
Second Way
You do it as a surprise for a friend. Wrap & # as above. In the packing box you write a note explaining what is to be done, I use a Christmas card and mark that #13 so she opens that the first day and understands what is going on. I did this to my sweet friend, Carol, over at Buttermilk Creek Farm, three years ago and we are still going strong.
Another idea is sending something (extra) for the hubby, like a coffee mug or something that you know he would enjoy, and don't forget the pets.
Ideas:
special coffee, notebook, bookmark, crafting supplies (if she is a crafter), a few 1/4 yards of fabric with matching thread (if she is a quilter), Christmas dish towels, placemats, Christmas coffee/tea mug, coffee, tea bags, really - the sky's the limit. It doesn't have to be expensive, but things that will be special to your friend, and handmade is always well received. Another idea - you can send a small (tabletop) tree and use the 14th - 24th with decorations. My friend Cindy, in Colorado, sent me all sorts of miniature things and my Christmas Eve gift was the roombox for me to decorate with all the gifts.
Last year we were moving out of state on 11/16 and I had 2 12 Days going. It wasn't the way I wanted it to be but I certainly did not want to disappoint my friends. I just told them to just pick one and open it, but I did mark "Christmas Eve" on the special gift. Their packages were mailed out in October and marked "Open on 12/13". (o: And those sweet friends did wait.
*******************
Wednesday
September 10

PUMPKIN STEMS
Good afternoon. I have been looking for dried pumpkin stems and was amazed at the prices online. At the grocery store this morning I noticed a beautiful assortment of winter squash - and many of them had wonderful STEMS! I bought 2 since we love winter squash, and I'll cook one tonight but first I'll cleanly cut off the stem and dry it. There is a good site online (see link below) for drying stems, very easy and just think of the possibilities!!!! (My head is swirling with ideas, but remember these stems will be for NEXT fall.) Even the mini pumpkins and decorative gourds are great choices. Maybe ask your local nursery or farm if you can have the pumpkins that were left from Halloween. Bring them home, harvest the stem and cut up the pumpkin for the wildlife. We did that once and in the spring we had a vine that took over the woods and we harvested a 32 lb. pumpkin in the fall. I just wanted to share this idea with you. Sometimes it takes a wee bit longer for MY brain to click into gear. Giggle. Hope this helps with your crafting ideas.
Here is the link
celebrate Creativity in all its forms
******
Saturday August 2
COFFEE STAIN RECIPE
4 cups hot water
1 -1/4 cups instant coffee
3 tablespoons imitation vanilla
2-3 tablespoons ground cinnamon
I put the water in the microwave for 2 minutes (I have filled my glass container with hot tap water). Remove and place on a hot pad on your work surface. Sprinkle a teaspoon of the instant coffee in the hot water, making sure the water is not too hot and the coffee will not "boil" over, add the remainder. Stir completely, add vanilla and cinnamon and stir well. I keep my mixture in the fridge, airtight container and marked "craft stain" so no family member mistakes it for something to eat or drink. Use mixture hot (not boiling) to stain your fabric, it also stains cotton string nicely.
**************
Monday, July 21
Fall Bowl Fillers


 For the tall pumpkin and acorn I used wool felt but wanted to try using coffee stained Osnaburg fabric for the other pumpkin. I am very pleased with the way it turned out, it has that "prim" look. You can add beards or sew X's on the acorn cap and stitch ribs down the pumpkins, I would think 6 on each, sets of 3 facing the center of the pumpkin. Also, contrasting sewing thread can make one of these very interesting, maybe even a metallic thread, like orange or green, even purple.
 ****************
Sunday, July 20, 2014
Good Sunday afternoon. I am working on a few of my Fall Bowl Fillers and will share with you along with my patterns for 2 pumpkins (2 sizes) and an acorn. Check back in a few days. Happy crafting.
****************
Happy March 1st.
This is the last of the eggs for this year, let's just say I'm eggs-husted with making eggs.
 The lavender egg is just paint over the paper mache, and added some pretty paper roses, the natural egg I just used some homemade seam binding strips from another project and glued on cute bunny ribbon that I purchased several years ago, the bow is crinkled seam binding.
****
Lacey Easter Eggs
 Another quick and easy project. This year I got a "little" smarter and bought paper mache eggs instead of spending hours cutting paper strips and gluing on plastic eggs (I am messy when it comes to combining those two ingredients). All I did was glue crinkly seam binding on the egg, leaving about a 3" tail (4 pieces) at the top of the egg to finish off with a cute little bow. I glued a paper flower on the front, and there is another egg for my "growing" collection.

How to crinkle seam binding
Either cut a desired length of seam binding (I use cream and plan to dye pieces as I need a certain color) or use the entire package or spool. Wet binding thoroughly, ring out excess water, roll up into a tight ball, secure with a rubber band or two if the ball wants to expand. Leave in a dry, warm place overnight. The next day unwrap the binding and hang to dry completely, trying not to stretch it out.
****
Easter Eggs
 I thought you would like to see a very quick and easy Easter decoration. Maybe on an Easter tree or make a few and use them as bowl fillers.


All I did was cut out an egg shape, cut out using a lovely spring green wool felt and stitch with white crochet thread. (I have several spools from my Mom and I use them for crafting as often as I can, it reminds me of my amazing Mom and her love for crochet, and it makes me feel close to her. Maybe that she handled the spool and in some way I can feel her touch on the threads.)

Fill with fiberfill, embellish with ribbon, yarn, buttons, sparkles, dried flowers, really anything that you have left from other crafts, or maybe a pretty pin (a butterfly or hummingbird) from a Mom or Grandmother. The limit is endless.
****
January 2014
My Valentine Tree
If you know me you know that I am a true Christmas person, I love it, think about it all year and am always planning.
Last year (2013), with the move and us arriving in NC on November 16 I was caught up in unpacking, Thanksgiving and trying to get ready for Christmas. I did okay - and by my standards that isn't good - not by a long shot. The season ended in a blur and I was not willing to pack away at least one tree, so I decided to make a Valentine tree.

I bought a pretty red glitter barn star (www.FactoryDirectCrafts.com) for the top. I tied red & white tulle into a bow and fastened behind the star. I didn't have enough red heart garland to drape on the tree so I just used it on the top.
The ornaments - I went into my stash and just picked out things that I like, the rusty hearts are from FCD.

 The heart is off a Valentine card.
 Cut 3 shapes out of scrapebooking paper
I used my AccuQuilt Go Cutter® for cutting my heart and cupcake shapes
 This is one of the rusty hearts, a picture from another card and I used pretty ric-rack which I just snipped into single pieces and glued to the front edge of the heart
 The little cupcake in the heart is from another Valentine card that I saved, the black heart is cut from fabric and glued to a piece of red cardstock
 Next I am going to paint skelton keys, sprinkle with glitter and hang them where I need some fill in ornaments, along with sweet little ribbon bows
 Here I just used tags and embellished with paper flowers, ribbon, the little lamb is a sticker, used ribbon to add color to the tag. The little teddy is from the fabric store, it's an applique, glued him to a felt heart.

 Lastly, I have beautiful old linens from my Grandparents. When sorting through them I took the pieces that were stained or had small tears and made them into little nosegay bouquets by simply bunching them up and tying a ribbon to make a "stem". Just laying them on a branch gives a pretty vintage look to the tree, I would never throw them away and this way it gives them purpose.
****
September 10
PUMPKIN STEMS
Good afternoon. I have been looking for dried pumpkin stems and was amazed at the prices online. At the grocery store this morning I noticed a beautiful assortment of winter squash - and many of them had wonderful STEMS! I bought 2 since we love winter squash, and I'll cook one tonight but first I'll cleanly cut off the stem and dry it. There is a good site online (see link below) for drying stems, very easy and just think of the possibilities!!!! (My head is swirling with ideas, but remember these stems will be for NEXT fall.) Even the mini pumpkins and decorative gourds are great choices. Maybe ask your local nursery or farm if you can have the pumpkins that were left from Halloween. Bring them home, harvest the stem and cut up the pumpkin for the wildlife. We did that once and in the spring we had a vine that took over the woods and we harvested a 32 lb. pumpkin in the fall. I just wanted to share this idea with you. Sometimes it takes a wee bit longer for MY brain to click into gear. Giggle. Hope this helps with your crafting ideas.
Here is the link
celebrate Creativity in all its forms
******
Saturday August 2
COFFEE STAIN RECIPE
4 cups hot water
1 -1/4 cups instant coffee
3 tablespoons imitation vanilla
2-3 tablespoons ground cinnamon
I put the water in the microwave for 2 minutes (I have filled my glass container with hot tap water). Remove and place on a hot pad on your work surface. Sprinkle a teaspoon of the instant coffee in the hot water, making sure the water is not too hot and the coffee will not "boil" over, add the remainder. Stir completely, add vanilla and cinnamon and stir well. I keep my mixture in the fridge, airtight container and marked "craft stain" so no family member mistakes it for something to eat or drink. Use mixture hot (not boiling) to stain your fabric, it also stains cotton string nicely.
**************
Monday, July 21
Fall Bowl Fillers
Sunday, July 20, 2014
Good Sunday afternoon. I am working on a few of my Fall Bowl Fillers and will share with you along with my patterns for 2 pumpkins (2 sizes) and an acorn. Check back in a few days. Happy crafting.
****************
Happy March 1st.
This is the last of the eggs for this year, let's just say I'm eggs-husted with making eggs.
****
Lacey Easter Eggs
How to crinkle seam binding
Either cut a desired length of seam binding (I use cream and plan to dye pieces as I need a certain color) or use the entire package or spool. Wet binding thoroughly, ring out excess water, roll up into a tight ball, secure with a rubber band or two if the ball wants to expand. Leave in a dry, warm place overnight. The next day unwrap the binding and hang to dry completely, trying not to stretch it out.
****
Easter Eggs
All I did was cut out an egg shape, cut out using a lovely spring green wool felt and stitch with white crochet thread. (I have several spools from my Mom and I use them for crafting as often as I can, it reminds me of my amazing Mom and her love for crochet, and it makes me feel close to her. Maybe that she handled the spool and in some way I can feel her touch on the threads.)
Fill with fiberfill, embellish with ribbon, yarn, buttons, sparkles, dried flowers, really anything that you have left from other crafts, or maybe a pretty pin (a butterfly or hummingbird) from a Mom or Grandmother. The limit is endless.
****
January 2014
My Valentine Tree
If you know me you know that I am a true Christmas person, I love it, think about it all year and am always planning.
Last year (2013), with the move and us arriving in NC on November 16 I was caught up in unpacking, Thanksgiving and trying to get ready for Christmas. I did okay - and by my standards that isn't good - not by a long shot. The season ended in a blur and I was not willing to pack away at least one tree, so I decided to make a Valentine tree.
The ornaments - I went into my stash and just picked out things that I like, the rusty hearts are from FCD.
I used my AccuQuilt Go Cutter® for cutting my heart and cupcake shapes
****
Bunny Buckets


These are fast and easy to make. I painted the peat pot, (also the inside rim) let dry completely. Add filler in pot and decorated. I used some covered floral wire (that I twisted) for the handle, just glue the ends to the sides of the pot. The fun part is hunting around your craft stash to think up decorating ideas.

*****************
Our first post will be
Easter Eggs.
 I took the larger plastic eggs and covered them with strips of brown paper (from small bags). I cut the strips narrow and tore them into about 1/2 - 1" strips. I mixed Aleen's Tacky Glue with a small amount of water, making a paste (my advice would be to keep mixing until you get a paper mache mix). Then I soaked the strips in that mixture for maybe 10 minutes. One by one I took the strips and laid them on the egg, every which way. It takes time because if you cover a large area at one time the strips slide around, stick to your
 fingers paws (I forgot to mention that this is Prudence's corner, not mine) I suggest that you let the eggs dry overnight before decorating them.
These are my finished eggs. I had beautiful lace that I was saving and it was perfect for the eggs. I used paper stick-ons (which I glued in place), I really enjoyed making them once I got past the gluing paper strips.
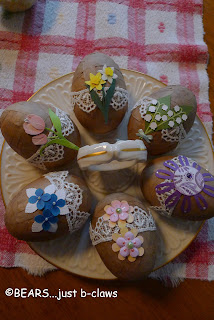
 Sadly I ran out of that wonderful lace so I did the last 3 a little differently.

*****************
Our first post will be
Easter Eggs.


Beautiful, just beautiful!!!!!
ReplyDeletehugs!
Carol Mouse
They are so pretty!!
ReplyDeleteHugs
Iris
Oh poor Prudence, I guess it wasn´t as easy to take out the glue?! Nevertheless your eggs are so pretty, you really could take place on one of our shows here presenting eastereggs. do you have those shows too?
ReplyDeleteHafe a funny weekend
Astrid
Gluggy, ukky sticky fur you must have Prudence. How long did you have to soak in the bath to get it all off.
ReplyDeleteHugs Wilbur
Prudence, it is a terrific idea to have a crafty corner where you can show everybear how to make pretty and fun stuff. As soon as we can get our mom to buy us some plastic eggs we're going to make some of these too. That is if we can get her to let us make a gluey mess...giggle
ReplyDeleteHugs,
Bellamine & Wendy